Note:
Pre-populating the cache will not have the desired effect if the traffic does not fall under the appropriate acceleration policy.
The Pre-Population feature allows you to warn the Exinda SMB (Server Message Block), Edge, or WAN memory cache of end users accessing the selected data. With a pre-populated cache, a first time access of the data is served up locally with LAN-like performance. The pre-population job can be created and started on demand or it can be created as a scheduled job so that it pre-populates at a particular time or on a recurring basis.
To pre-populate any of these caches, you must ensure that you have acceleration configured properly, including creating a policy that handles the type of traffic that you want to be pre-populated.
The pre-population service uses the management IP address on the Exinda as the “Client” IP for this process. The IP address must either be configured on the inline bridge itself or on a dedicated Management Interface residing on the “inside network” of the Exinda.
Exinda recommends that you configure your policies first, ensure that traffic is being processed properly by viewing it in the real-time monitor, and then create and optionally schedule the pre-population job.
|
|
Note: Pre-populating the cache will not have the desired effect if the traffic does not fall under the appropriate acceleration policy. |
|---|
When creating a pre-population object you will need to specify:
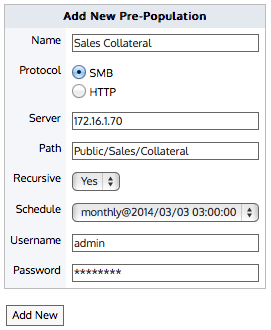
Figure - Creating the pre-population object using the previously created schedule
If you need to schedule pre-population, it is easiest to create the scheduled job first without specifying CLI instructions. Then you can select the scheduled job when creating the pre-population object. Note that you can use a scheduled job that already has activities associated with it. Assigning the schedule to the pre-population object automatically adds the pre-population CLI instructions to the scheduled job.
Go to Configuration > System > Optimization > Pre Population.
To schedule it, go to Configuration > System > Setup > Scheduled Jobs.
Edit the pre-population object and select the scheduled job.
To use pre-population, you must have the following:
|
|
Note In an X800 environment you need an active Community and Wan Memory for SMB pre-population to work. |
|---|
From the Schedule drop-down list, select a schedule to use for pre-population. If you do not intend to schedule this pre-population action, then leave the schedule blank.
Note You can select an existing scheduled job that already has CLI actions associated with it or you can create a new scheduled job specifically for this pre-population action. If a suitable job is not available, leave the Schedule field blank. See to create a scheduled pre-population job to create a new schedule, and then edit the pre-population object by selecting the new schedule. |
Click Add New.
The job appears in the list of configured pre-population jobs.
To begin pre-populating the selected cache immediately, in the list of configured pre-population jobs click Start.
The content from the specified location begins to populate the cache.
Create a scheduled job without specifying the CLI in the commands field, then create the pre-population object specifying this schedule. Note that you can have the pre-population action be added to another scheduled job containing other actions.
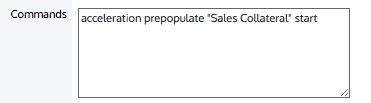
View the details of the scheduled job.
The pre-population CLI instructions have been added to the Commands field for the scheduled job.
When the cache is pre-populated, the Exinda appliance acts as the client in the pre-population conversation, and therefore needs a "Client" IP. This Client IP must be visible to the server that is providing the content to be cached. The IP address can be configured on the inline bridge (see Configure IP Address). Ensure that this bridge is attached to the circuit with the policy that handles the type of traffic that to be pre-populated. The IP address can be configured on a dedicated management interface provided that the IP is on the same part of the network as the client that is to request the cached content.
|
|
|