When accelerating encrypted traffic, the Exinda appliance transparently decrypts the traffic, performs the relevant application acceleration techniques, such as TCP Acceleration, WAN Memory, or Edge Cache caching, and then re-encrypts the traffic. The Exinda appliances must have access to the appropriate certificates or certificate authority (CA) certificates, and the public keys to decrypt and re-encrypt the traffic. You can import a certificate or a CA certificate, or generate a self-signed certificate or CA certificate.
On the Certificates tab, you can import normal certificates and you can generate untrusted self-signed certificates. Note that the normal certificates may be trusted Certificate Authority (CA)-signed certificates or self-signed certificates. In the Certificates and Keys table, you can see a list of all the (non-CA) certificates available on the appliance. You can show, delete, or export any of these certificates.
On the CA Certificates tab, you an import CA certificates and you can generate untrusted self-signed CA certificates. By importing CA certificates, the appliance can offer the entire chain of trust to clients when performing an SSL handshake. In the CA Certificates and Keys table, you can see a list of all the CA certificates available on the appliance. You can show, delete, or export any of these certificates.
![]() |
Note 
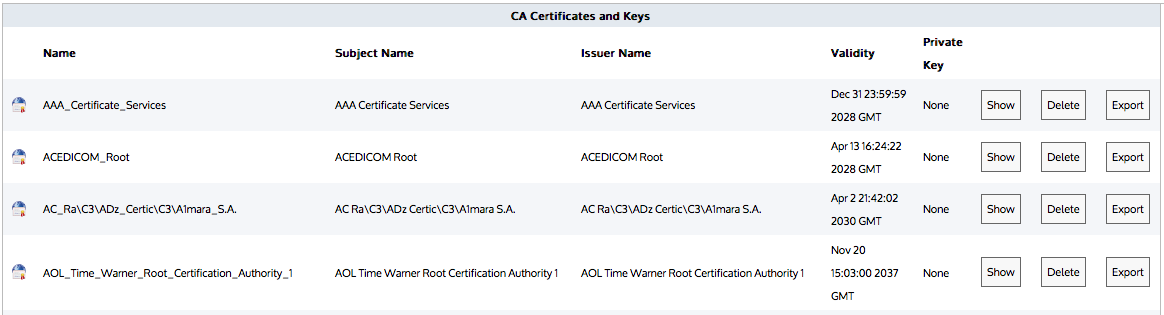
Certificates and keys are stored securely on the Exinda appliance. It is not possible to export or view the private key once it has been imported. If you lose the configuration or need to migrate the configuration to another appliance, you must manually load the private key again. |
---|
![]() |
Note The interface for importing both Certificates and CA Certificates is the same. |
---|
![]() |
Note The interface for generating both Certificates and CA Certificates is the same. |
---|
Figure - List of CA Certificates and Keys (the list is similar on the Certificates tab for Certificates and Keys)
Go to Configuration > System > Certificates.
In the Import Certificate and Key Details section:
(Optional) Type a Name for the certificate. If no name is specified, the filename of the certificate is used.
Private keys are stored separately from certificates, and are automatically named the same as the certificate, with '_key' appended to the end.
Select the Certificate/Key Format.
PEM—Common format for certificates issued by Certificate Authorities. PEM certificates usually have extentions such as .pem, .crt, .cer, and .key. If PEM format is selected, an additional upload field is exposed so that the private key can be uploaded with the certificate.
Click Import.
The certificates are displayed in the Certificates and Keys table on the Certificates tab or CA Certificates and Keys table on the CA Certificates tab. From the tables the contents of a certificate can be viewed, or the certificate can be deleted or exported.
To encrypt SSL traffic that passes through the network without requiring the traffic to be signed, a self-signed certificate needs to be generated.
In the Import Certificate and Key Details section:
Click Generate.
After the certificate has been created, it appears in the list of certificates on the Certificates tab.
View the contents of an SSL certificate to see the owner of the certificate, information on the issuer of the certificate, and the time period the certificate is valid.
If an SSL certificate is only available on one appliance, export the certificate so it can be imported onto the other Exinda appliances on the network.
Click Save.
The certificate is downloaded onto the computer accessing the Exinda Web UI.
Delete an SSL certificate from the Exinda appliance when it expires, or becomes invalid.
In the confirmation dialog, click OK.
The certificate is deleted.
|
|