When caching encrypted content, you need to specify a certificate that Edge Cache will use to create and sign a dynamically created certificate on behalf of the server. You will need to ensure that this certificate is trusted by all the computers on your network that will have traffic that passes through Edge Cache. It is recommended that you create a self-signed CA certificate (as opposed to a self-signed certificate without the CA designation) to simplify loading and trusting the certificate by the computers in your network.
When using Edge Cache for encrypted traffic, you must create and import a signing certificate in the Certificates and Keys store. This certificate and its corresponding key will be used by Edge Cache to generate and sign dynamic SSL certificates for proxied sites. For all practical purposes, this certificate becomes a root certificate and you become a Root CA.
Use the following OpenSSL commands:
openssl genrsa -out myCompanyCA.key 2048
openssl req -x509 -new -key myCompanyCA.key -out myCompanyCA.cer -days 1000
-subj /CN="myCompany CA”
This will generate two files: a.key file and a .cer file that can be uploaded in the CA certificates UI.
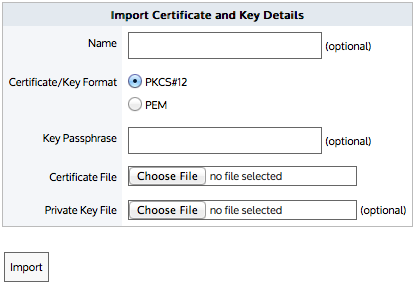
Figure - Import certificate in CA Certificates store
(Optional) Type a Name for the certificate. If no name is specified, the filename of the certificate is used.
Private keys are stored separately from certificates, and are automatically named the same as the certificate, with '_key' appended to the end.
Select the Certificate/Key Format.
PEM—Common format for certificates issued by Certificate Authorities. PEM certificates usually have extentions such as .pem, .crt, .cer, and .key. If PEM format is selected, an additional upload field is exposed so that the private key can be uploaded with the certificate.
Click Import.
The certificates are displayed in the Certificates and Keys table on the CA Certificates and Keys table on the CA Certificates tab. From the tables the contents of a certificate can be viewed, or the certificate can be deleted or exported.
If the browsers in your network don't trust the certificate, you may get a warning or the sites may fail to load. In this case, each computer needs to import the certificate so that the certificate will be trusted when negotiating with Edge Cache over SSL.
You will need to export the certificate from the appliance and import it to the desired computers.
Ensure that the Export Certificate Format is set to PEM.
The PEM format encodes the certificate and private key. It may include an entire certificate chain including public key, private key, and root certificates.
It is recommended that you follow the instructions provided by Microsoft:
http://technet.microsoft.com/en-us/library/cc772491.aspx
![]() |
Note: These instructions assume that you are using a domain controller or a workstation running the domain admin MMC snapins while logged into a domain as a domain admin. Some of the elements that are referred to in the instructions won't exist if you a using Windows Server 2008 R2. |
---|
To install a certificate, you must use the Keychain Access program. To start the Keychain Access program,double-click certificate file.
If you are importing a CA certificate:
Double-click the exported PEM file for the CA certificate to start the Keychain Access program.
The Keychain Access window appears.
The certificate has automatically been installed with no additional steps.
If you are importing a non-CA certificate:
Double-click the exported PEM file for the non-CA certificate to start the Keychain Access program.
< Previous: Configuring Edge Cache Introduction | Next: Configuring DNS >
|
|